
Mastering Minecraft: Generator Servers, Settings, and Essential Plugins
Minecraft is a game that thrives on creativity and customization. From generator servers to specific plugins like those for Skyblock, there are countless ways to enhance your Minecraft experience. This guide will walk you through setting up generator servers, tweaking generator settings, and utilizing essential plugins, including how to create your own.
Minecraft Generator Servers
Generator servers in Minecraft are specialized servers that generate unique worlds or specific types of terrain based on set parameters. These servers are popular for creating customized gameplay experiences and unique challenges.
Setting Up Minecraft Generator Servers
- Choose a Hosting Service:
- Select a reliable Minecraft server hosting provider. Popular choices include Apex Hosting, Shockbyte, and Akliz.
- Select Server Type:
- When setting up your server, choose the version of Minecraft you want to run. Many hosts offer one-click installs for popular modpacks and server types.
- Install Generation Plugins:
- Use plugins or mods like TerrainControl, OTG (Open Terrain Generator), or Biomes O’ Plenty to customize the terrain generation.
- Configure the Server:
- Access the server configuration files and customize settings as needed. This can include setting biome types, terrain features, and other world generation parameters.
Popular Generator Plugins
- TerrainControl:
- Allows for extensive customization of world generation, including custom biomes and terrain features.
- Open Terrain Generator (OTG):
- Provides advanced terrain generation options and supports custom world creation.
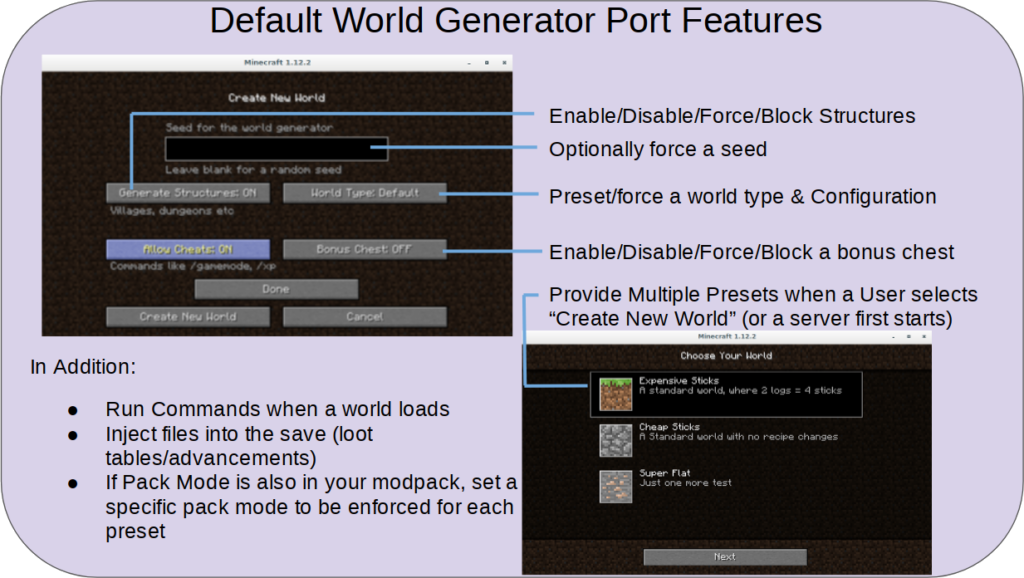
Minecraft Generator Settings
Customizing generator settings can help you create the exact world you envision. Here’s how to adjust these settings:
Adjusting Generator Settings
- Access Server Configuration:
- Log into your server control panel and navigate to the configuration files, typically named
server.properties,bukkit.yml, or similar.
- Log into your server control panel and navigate to the configuration files, typically named
- Modify World Generation Parameters:
- Edit parameters like seed, biome size, and terrain type. Each plugin will have specific settings you can adjust.
- Use Configuration Tools:
- Some plugins come with GUI tools or web-based configuration editors to simplify the process.
- Save and Restart:
- After making changes, save the configuration files and restart your server to apply the new settings.

Creating Custom Plugins with a Minecraft Plugin Maker
Creating custom plugins can add unique features to your Minecraft server. Here’s a basic guide on using a Minecraft plugin maker:
Getting Started with Minecraft Plugin Maker
- Set Up Your Development Environment:
- Install Java Development Kit (JDK) and an Integrated Development Environment (IDE) like IntelliJ IDEA or Eclipse.
- Download and set up the Bukkit or Spigot API.
- Create a New Project:
- Start a new project in your IDE and include the Bukkit or Spigot library.
- Write Your Plugin:
- Create a main class that extends
JavaPlugin. Override methods likeonEnable()andonDisable()to define what your plugin does when the server starts or stops.
- Create a main class that extends
- Compile and Test:
- Compile your plugin and place the resulting
.jarfile into your server’spluginsdirectory. Restart the server and test your plugin.
- Compile your plugin and place the resulting
- Debug and Refine:
- Use in-game testing to debug and refine your plugin. Utilize server logs to identify and fix issues.
Essential Minecraft Skyblock Plugin
Skyblock is one of the most popular game modes in Minecraft, offering a unique survival challenge. Using the right Skyblock plugin can enhance this experience.
Best Skyblock Plugins
- ASkyBlock:
- Features include island management, team play, and custom challenges.
- Allows players to create and manage their own islands with extensive customization options.
- BentoBox:
- A modular plugin that supports multiple game modes, including Skyblock, AcidIsland, and more.
- Offers features like custom islands, challenges, and advanced permissions.
- SuperiorSkyblock2:
- Provides a highly configurable Skyblock experience with island upgrades, missions, and leaderboards.
- Supports various expansions and customizations to tailor the Skyblock experience.
How to Install and Configure Skyblock Plugins
- Download the Plugin:
- Visit the plugin’s official page on Spigot or Bukkit and download the latest version.
- Install the Plugin:
- Place the downloaded
.jarfile into your server’spluginsdirectory.
- Place the downloaded
- Configure the Plugin:
- Start your server to generate the plugin’s configuration files.
- Access the configuration files in the
pluginsdirectory and adjust settings such as island size, challenges, and permissions.
- Restart and Test:
- Restart your server to apply the configuration changes.
- Test the plugin to ensure it functions as expected and make any necessary adjustments.

Conclusion
Enhancing your Minecraft server with custom generator settings, plugins, and configurations can significantly enrich your gameplay experience. Whether you’re setting up a unique terrain generator, creating custom plugins, or diving into the Skyblock game mode, these tools and tips will help you get the most out of your Minecraft adventures. Start customizing your server today and explore the endless possibilities that Minecraft has to offer!
Related Post

Player Engagement: Leveraging Weapon Customization and Progression in Game Development
In the ever-evolving landscape of game development, weapon customization and progression systems have emerged as [...]
Innovative Weapon Mechanics: Pushing the Boundaries of Gameplay in Game Development
In the ever-evolving landscape of game development, innovative weapon mechanics serve as a catalyst for [...]